We all know the issue:
First Gen Tacomas have uncomfortable seats, they are also showing their age (a minimum of 20 years old at this point). If you’re here, you’ve likely encountered numerous threads about various seat installations, many to varying degrees of success.
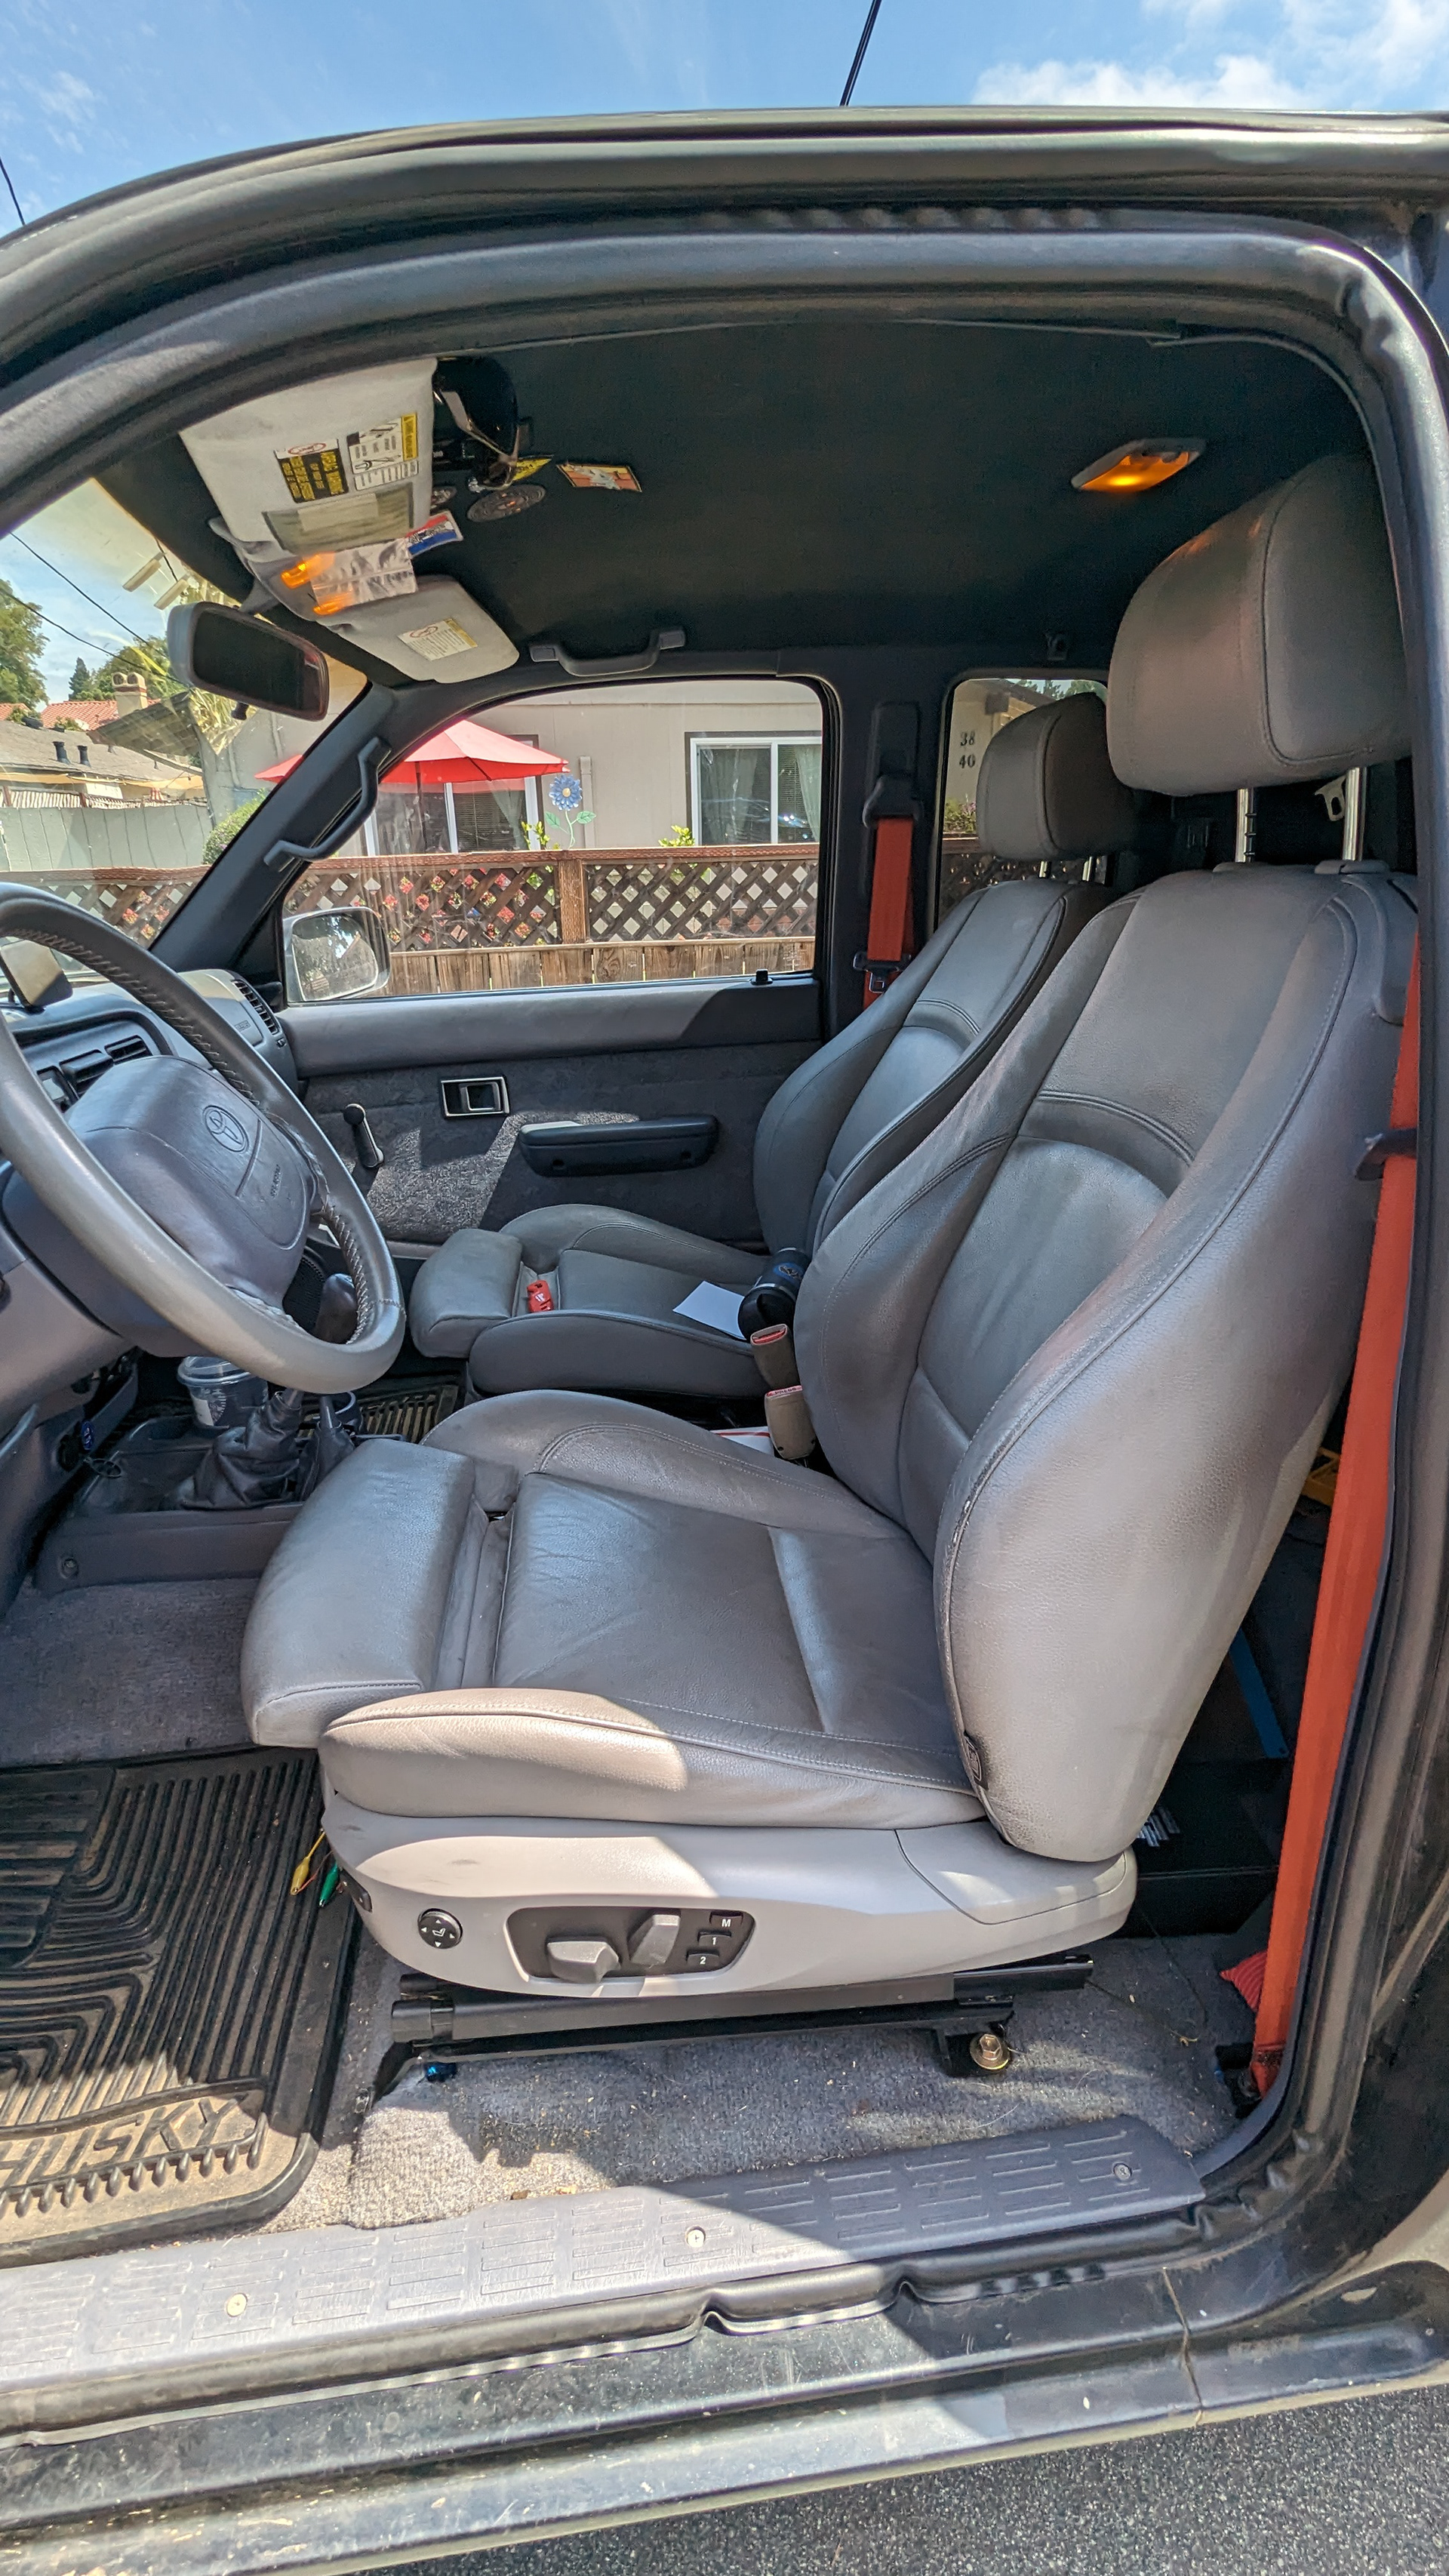
Below is a write-up on how I installed BMW seats into my 1st gen Tacoma (or 3rd gen 4 runner). That said, the information is more specific to the BMW seats rather than the vehicle they are going into.
**If you choose to utilize any information from this page to attempt something similar, you do so with the awareness that the author is not responsible for your actions and how your actions may then put you in legal trouble or harm's way. The author makes no claims nor guarantees as to whether putting seats from one vehicle into another is either street-legal or safe. Bolts should always be tightened to manufacturer specifications. Any electrical modifications you perform on your vehicle should be done with care and understanding that you could cause irreparable damage to the vehicle. Proceed at your own risk.**
There are a few challenges that must be considered anytime you’re installing aftermarket or using from a different vehicle:
• Mounting the seats
• Positioning the seats
• Wiring the electronics (if applicable)
• Seatbelt buckle and anchoring
• Seat tilt for rear access (if you have an extended cab/coupe)
• Color, which is less critical
• Positioning the seats
• Wiring the electronics (if applicable)
• Seatbelt buckle and anchoring
• Seat tilt for rear access (if you have an extended cab/coupe)
• Color, which is less critical
General information on BMW seats (provided to me by a BMW driver)
• E90 seats (Saloon), E91 (Touring), E92 (Coupe), and E93 (convertible) are found in 2006 - 2011 3 series BMWs
• Models include: 316i, 318i, 320i, 320si, 323i, 325i, 328i, 330i, 335i and the M3 (additional models outside the US)
• Seats came in Leather and "Leatherette" (maybe cloth seats in Europe, but unknown)
• There were 3 major packages that affect the seats:
• Premium Package: Could include leather seats, power adjustment, and lumbar support
• Cold Weather package: Included heated seats
• Sports package: Included Sport seats, that have inflatable bolsters and extendable thigh support
• The seat memory function will not work with this mod. The memory was stored in the BMW key, and that data was used by the vehicle CANBUS to then adjust the seat to the driver.
Mounting
The BMW seats are awesome for this. They have no feet and are designed to receive a bolt in the four corners. This makes attaching them to a bracket SUPER easy. I used the Planted brackets for my vehicle. They are very well-made, and confidence-inspiring. I have seen other methods for mounting, and you can find that information at the bottom of this page.
• Hardware for securing seats to brackets: 3/8-16x1" Grade 8 Bolts, Nuts, Flat and Lock Washers
• Planted seat brackets (1st Gen Tacoma): Driver Passenger
• Reuse your OEM seat bolts and torque to spec to secure the bracket into your vehicle
• Planted seat brackets (1st Gen Tacoma): Driver Passenger
• Reuse your OEM seat bolts and torque to spec to secure the bracket into your vehicle
When securing the seats to the brackets, I found it helpful to connect a battery to the seats so I could slide the tracks forward/back. I also recommend making a cardboard template for the bolt-hole distances/layout to more easily mark the brackets where you need to drill.
Seats bolted in place on the driver's side. You can see the bracket with its feet (horizontal plate below the slide rails).
The front left corner of the driver's seat.
You can see the Grade 8 bolts that are securing the seat to the bracket, with my OEM bolts securing the bracket to the floor.
You can see the Grade 8 bolts that are securing the seat to the bracket, with my OEM bolts securing the bracket to the floor.
Positioning
Using the Planted brackets as a basis these seats will sit ~1.5 inches higher than stock. I’m 5’11”, wear 32-length pants; and while I sit high, it’s not uncomfortable or awkward. I do have to tilt the steering wheel up to near the maximum. If your truck does not have a steering wheel tilt, you likely will want to explore the floor mounting option.
In terms of left/right, I centered on the brackets (a little tight on the door side but leaves you ~7 inches for a center console). If you have large arms, you may want to put them towards the center console a little bit. Also, consider your preference for centering with the steering wheel. Mine is to the left by about ½ inch, but it’s hardly noticeable, and I wanted the center console space (using a 40mm ammo can – write up to come following project completion).
This photo shows how much space there is between the door and the seat to manipulate the controls. This allows space for your hand to reach down and adjust the controls while sitting in the seat.
This is with the seat centered on the bracket.
This is with the seat centered on the bracket.
Electronics
Seat wiring:
If at all possible, when you get your seats, get both sides of the connector that connects the seats. It’ll make the removal of the seats in the future (or replacement) much simpler. The goal here is to wire everything to that connector, and essentially "install" it into your vehicle.
There's an amazing website/project that has manuals from 1982 up to 2013. Here is a link for the 2008 BMW 328i (what I pulled my seats out of) and an image to show the file tree. I recommend finding the vehicle and model for your seats, as various things have changed from year to year.
Power:
The motors pull up to 30 amps, and you will need to make sure you supply this with low enough gauge wire that you will be able to deliver this without burning up your wire. Granted, the motors will pull less if you weigh less, or you’re using the seat angle motor. So 30amps is likely overkill, but I made sure I could supply that and then some. I was also powering a speaker amp and a subwoofer and am going to add some charging ports into the center console. Highly unlikely that the stars will align, and I’ll pull max amperage on everything at the same time, but I made sure I had a large trunk line coming into the center console to power everything. Another option is to use a lighter gauge wire and fuse appropriately.
I routed the trunk line out to a bus bar for distribution. I then added a fuse box and installed the appropriate fuses for the seats. (I’ll add more information on the fuse amounts and wiring diagrams).
Ultimately, I ran 4 AWG pure copper stranded. 15 feet was just enough to run off the battery, go straight back to the firewall, then across the firewall (below the windshield), and into the cab popping in behind the glovebox. I then went under the carpet and back to the center console.
A couple of quick links:
• I used 6 AWG copper wire to run to the seats themselves.
• 18 AWG copper was used everywhere that needed lower power.
• These copper wire crimp lugs came in handy for making connections.
An astute eye may notice that I haven't wired the seats in with relays (so the power is fully disconnected when not on). I am currently chasing an electrical gremlin, and I believe the lack of the relay is the culprit. I'm planning on redoing my seat wiring in short order and will update appropriately at that point.
E92 Pinout that I found on a forum. I believe this to be from an online BMW manual resource that is now defunct.
Known Pins:
Pin 1: I believe this might control the computer for the seat heaters. I have yet to test this and don't know how it would control them. I will update if I learn anything.
Pin 2: Positive in from the CANBUS trick circuit
Pin 3: Negative in from the CANBUS trick circuit
Pin 4: Positive for seat motors and heaters (30 amp fuse)
Pin 7 or 9: Positive (10 amp fuse)
Pin 9 and Pin 13: Negative
Note: Pins 18 and 19 are used for the airbags. I recommend not doing anything with these.
Showing the yellow stock BMW connector. On the right, you can see the orange and green wires that are for the computer module.
Here you can see how I wired up the seats.
The larger wires coming from the bottom left and connecting to the bus bar (bottom right) came in through the firewall behind the glove box and are connected to the battery. I'm then using the bus bar to distribute to my amp, subwoofer, and then to the fuse box (top right). Off the fuse box, I'm connecting the seats, but have future-proofed for adding phone charging into my center console.
The large red wire is the seat motor power.
The small red and black wire is for the inflators (lumbar and bolsters)
Brown wires are negative.
Tricking the computer:
The solution to getting these seats working is far easier than the quantity of things I tried. I’ll save you the pain and stick to what worked with minimal backstory.
These seats have an onboard computer. This computer checks to see if it’s connected to the main vehicle CANBUS system (BMW computer). Because we’re putting these seats not in a BMW, and pulling the BMW CANBUS out just to operate seats is silly, we have two options. Abuse the timeout system: The seats timeout after 10 seconds of no computer communication, and 10 seconds of non-use. This means, that when you first apply power to the seats, you can adjust them, and they will work fine. Just don’t wait more than 10 seconds between adjustments.
The first option here is to do nothing special. Just wire the seats up, and they will only work for the first ten seconds your car is one. This is not a great option, but you’d still be able to move them to a specific setting.
The second option is to install a relay to a switch, so you can selectively connect them to power. The idea here, is you flip the switch, adjust your seat, and disconnect the switch.
The better way is to use a 555 timer to trick the seats into thinking they are still connected. (I’m not sure if the seats think they are now connected to the CANBUS, or if this system just resets the 10-second timeout, either way, it works.)
Below are links to the needed components. But essentially, you first wire a step-down converter to drop the voltage to 5 volts, then input those 5 volts into the 555 timer. The 555 timer will take that constant 5volt signal, and turn it into a pulse. You want a 50% duty cycle at 1 hertz. This means the system will receive 5 volts, 0 volts, 5 volts, and then 0 volts on a 1-second cycle.
Power source -> step down converter -> 555 timer -> seat wiring
I wired this all up to my ignition wire, as it won’t draw much (if any) amperage. I did this because it was convenient, as I had an ignition wire already in the center console vicinity, as I use it to turn on my amp. I’ve had zero issues in 8 months, YMMV (Your Mileage May Vary).
Minimum components:
• 555 Timer
• Step-down converter (Buck)
• 555 Timer
• Step-down converter (Buck)
Better components, due to ease of use:
• 555 timer with screen
• Step Down (Buck) with voltage meter
• 555 timer with screen
• Step Down (Buck) with voltage meter
Lastly, if you aren't tying the 555 timer circuit into an ignition-powered line and running straight to the battery, you may consider putting in a Battery voltage protection circuit before the step-down converter. You can set this to turn the system on at 14v or higher, which would substitute for tying into the ignition wire but would make it so the seats ONLY work when the vehicle is on, not just the key in the on position.
Seatbelt
Definitions for the following section:
• TONGUE (male) connector - The part that is pushed into the Buckle to connect the Seat Belt.
• BUCKLE (female) connector - The part into which the tongue is pushed to connect the Seat Belt.
• STALK/CABLE - Part of buckle assembly used to connect the buckle to the Anchorage.
• ANCHORAGE FITTINGS - Set screws, nuts, washers, brackets etc.
• ANCHORAGE POINTS - Provided on the vehicle/seat for attachment.
Here I had a little trouble. The tongue on the seatbelt system in the Tacoma is the wide style plate (the auto industry narrowed these at some point). While the BMW buckle (the receiver for the latch plate) is designed for the narrow tang (at least it was on my 2008 e92 seats, YMMV). Due to this, one of the components needed to be changed. (It’s also worth noting that the BMW buckle was originally connected to the airbag system in the BMW to tension the seatbelt in the event of an accident.)
I was in a time pinch, and making this up as I went, so I went to a junkyard to see if I could find a buckle that the stalk/cable was longer (the BMW it was nearly 8 inches, while in the Tacoma it’s like 3, numbers are off memory). I ended up finding a buckle that would receive a wide tongue with a 6-inch stalk/cable out of a Subaru (iirc it was a 2005 forester, but don’t quote me on that). I grabbed those and installed them. Worked like a charm, except, the anchorage fitting on the Subaru part had a large ID (inner diameter) on the plate that you bolted onto the smaller BMW hole. I ended up designing and printing a bracket to hold them in place. These have worked great now for 8 months with zero issues.
The best option to resolve the seatbelt, and likely the safest is to replace the Tongue portion of the seatbelt assembly with a BMW tongue (source from a junkyard, or BMW parts site), and replace your seatbelt webbing at the same time. If you haven’t swapped your webbing yet, I recommend it, as these trucks are all 20 years old or more now, and it gets stiff, causing you to think your retractor needs servicing, when it likely doesn’t. As for the seatbelt buckle, I don’t recommend the path I took, and anything you do here is your responsibility.
If you are doing seatbelt webbing replacement, you’ll need to remove your seatbelt assembly (B pillar plastics are recommended to be pulled for this).The upholstery shop I used had some thread they used.
• I used seatbelt webbing similar to this webbing.
• Seatbelt stop buttons that I used.
• The upholstery shop I used had some thread they used.
• Seatbelt stop buttons that I used.
• The upholstery shop I used had some thread they used.
OEM Tacoma Tongue
Subaru Buckle
Bolted to the BMW seat
Lots of colors going on and I'm not stoked with the tan of the buckle, but it is functional and has dropped down the priority list at the moment.
Subaru Buckle
Bolted to the BMW seat
Lots of colors going on and I'm not stoked with the tan of the buckle, but it is functional and has dropped down the priority list at the moment.
Seat Information
From my research, the era seats I used (E92, 2008 BMW 3 series) come with a variety of options:
Seat adjustment:
• Manual
• Motorized/powered
Seat adjustment:
• Manual
• Motorized/powered
Seat Style:
• Comfort: smaller bolsters, less seat adjustments
• Sport: Adjustable thigh support, adjustable bolsters
• Comfort: smaller bolsters, less seat adjustments
• Sport: Adjustable thigh support, adjustable bolsters
Finish:
• Leather
• Faux leather
• I’m unsure whether there is a cloth option
• Leather
• Faux leather
• I’m unsure whether there is a cloth option
Color:
• Grey (relatively matches the Tacoma blue/grey)
• Tan (semi matches the Tacoma tan)
• Black
• Red
• Grey (relatively matches the Tacoma blue/grey)
• Tan (semi matches the Tacoma tan)
• Black
• Red
Additional options:
Heat:
I’m unaware if all powered seats come equipped with seat heaters. YMMV, do your research on what you’re buying. Alternatively, non-motorized seats may come equipped with seat heaters.
I’m unaware if all powered seats come equipped with seat heaters. YMMV, do your research on what you’re buying. Alternatively, non-motorized seats may come equipped with seat heaters.
I have not yet connected the heat and will update this section once I do.
Quick tilt:
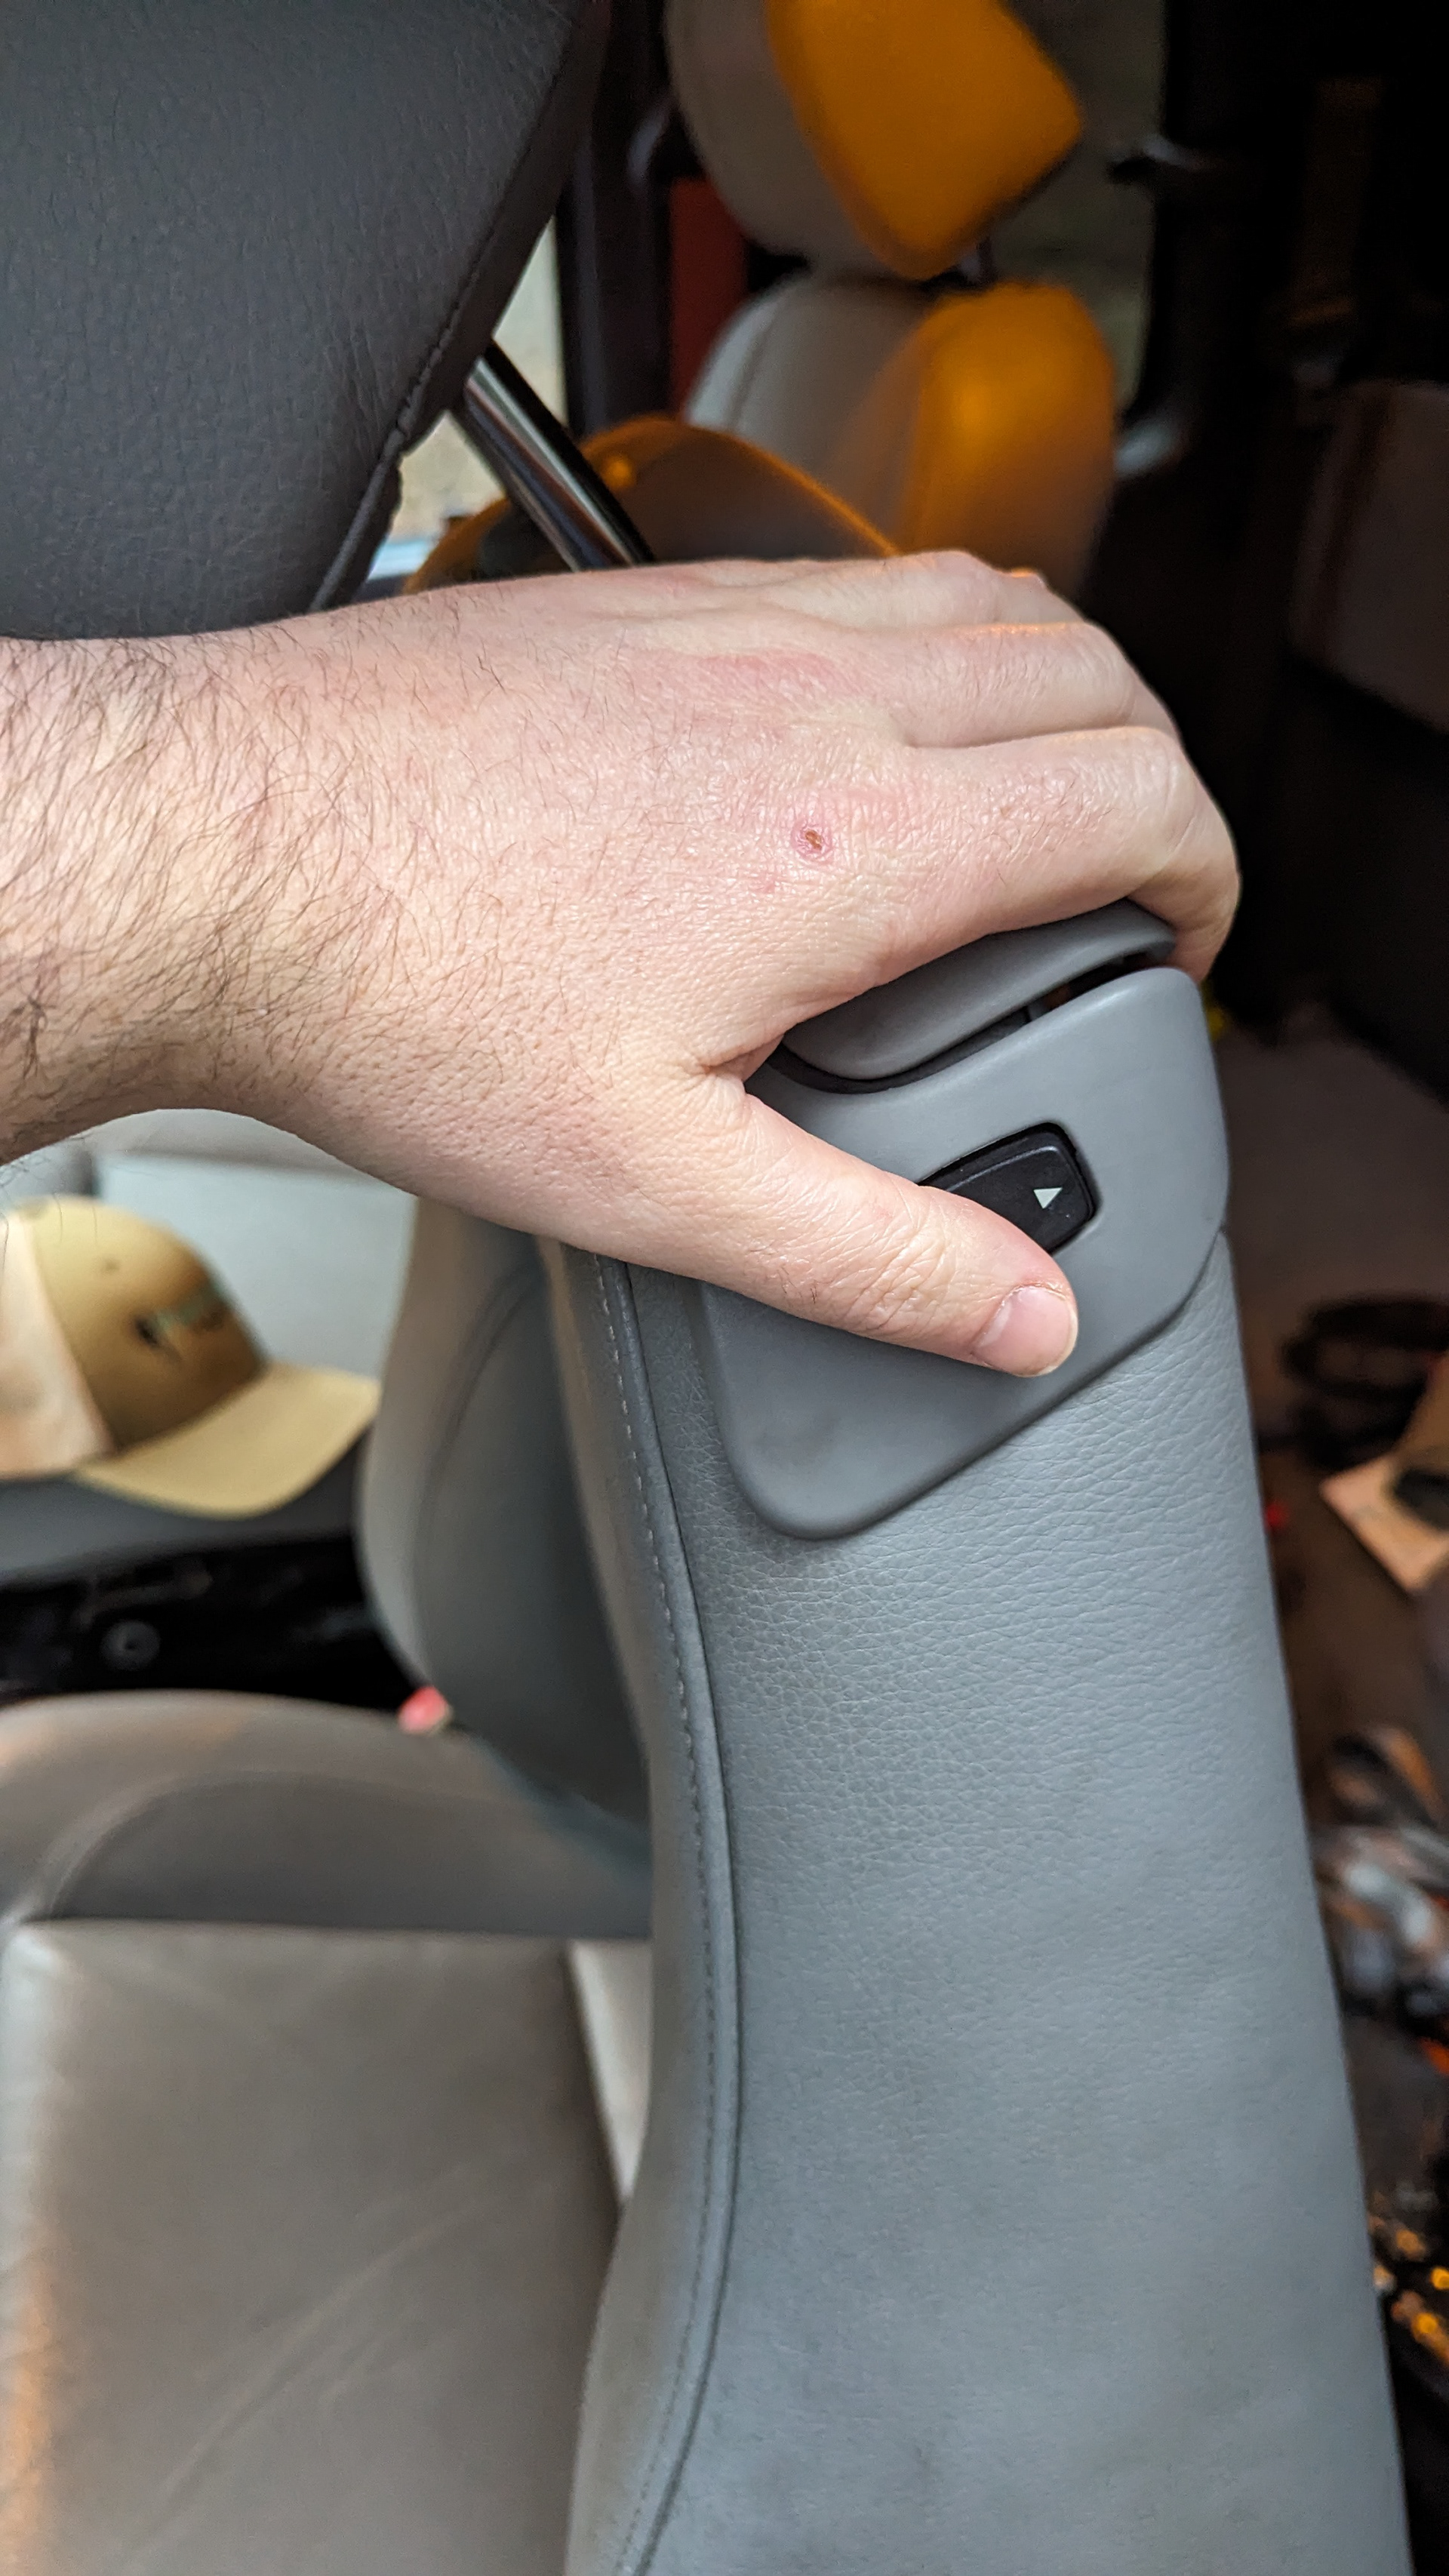
Seats out of coupes will have a handle on the top of the seat that is a quick-release tilt. These seats are model E92 (Coupe) and/or E93 (Convertible).
Seats out of coupes will have a handle on the top of the seat that is a quick-release tilt. These seats are model E92 (Coupe) and/or E93 (Convertible).
Seats out of 4-door 3-series will not have this handle and are known as E90 (Sedan) and/or E91 (Wagon) seats.
If you have an extended cab, you will want the E92. If you have a regular cab or 4-door, it’s less important, but I could see it being nice in a regular cab.
**Quick note on the quick tilt: there is a front/back switch, that does not work on my seats. I'm pretty certain this is to slide the seat forward and would be SUPER useful. It's on my list to explore this in the future, and further I want to see if I can increase the voltage to the motor when this switch is engaged, as that would make it super nice. I believe this switch runs through the CANBUS, which would explain why it doesn't work (same as the memory function buttons).
**Quick note on the quick tilt: there is a front/back switch, that does not work on my seats. I'm pretty certain this is to slide the seat forward and would be SUPER useful. It's on my list to explore this in the future, and further I want to see if I can increase the voltage to the motor when this switch is engaged, as that would make it super nice. I believe this switch runs through the CANBUS, which would explain why it doesn't work (same as the memory function buttons).
Seat Memory:
One bummer on these seats is that the memory function is routed through the CANBUS, and therefore does not work outside of a BMW. This is very common when finding seats from other cars, but still disappointing.
One bummer on these seats is that the memory function is routed through the CANBUS, and therefore does not work outside of a BMW. This is very common when finding seats from other cars, but still disappointing.
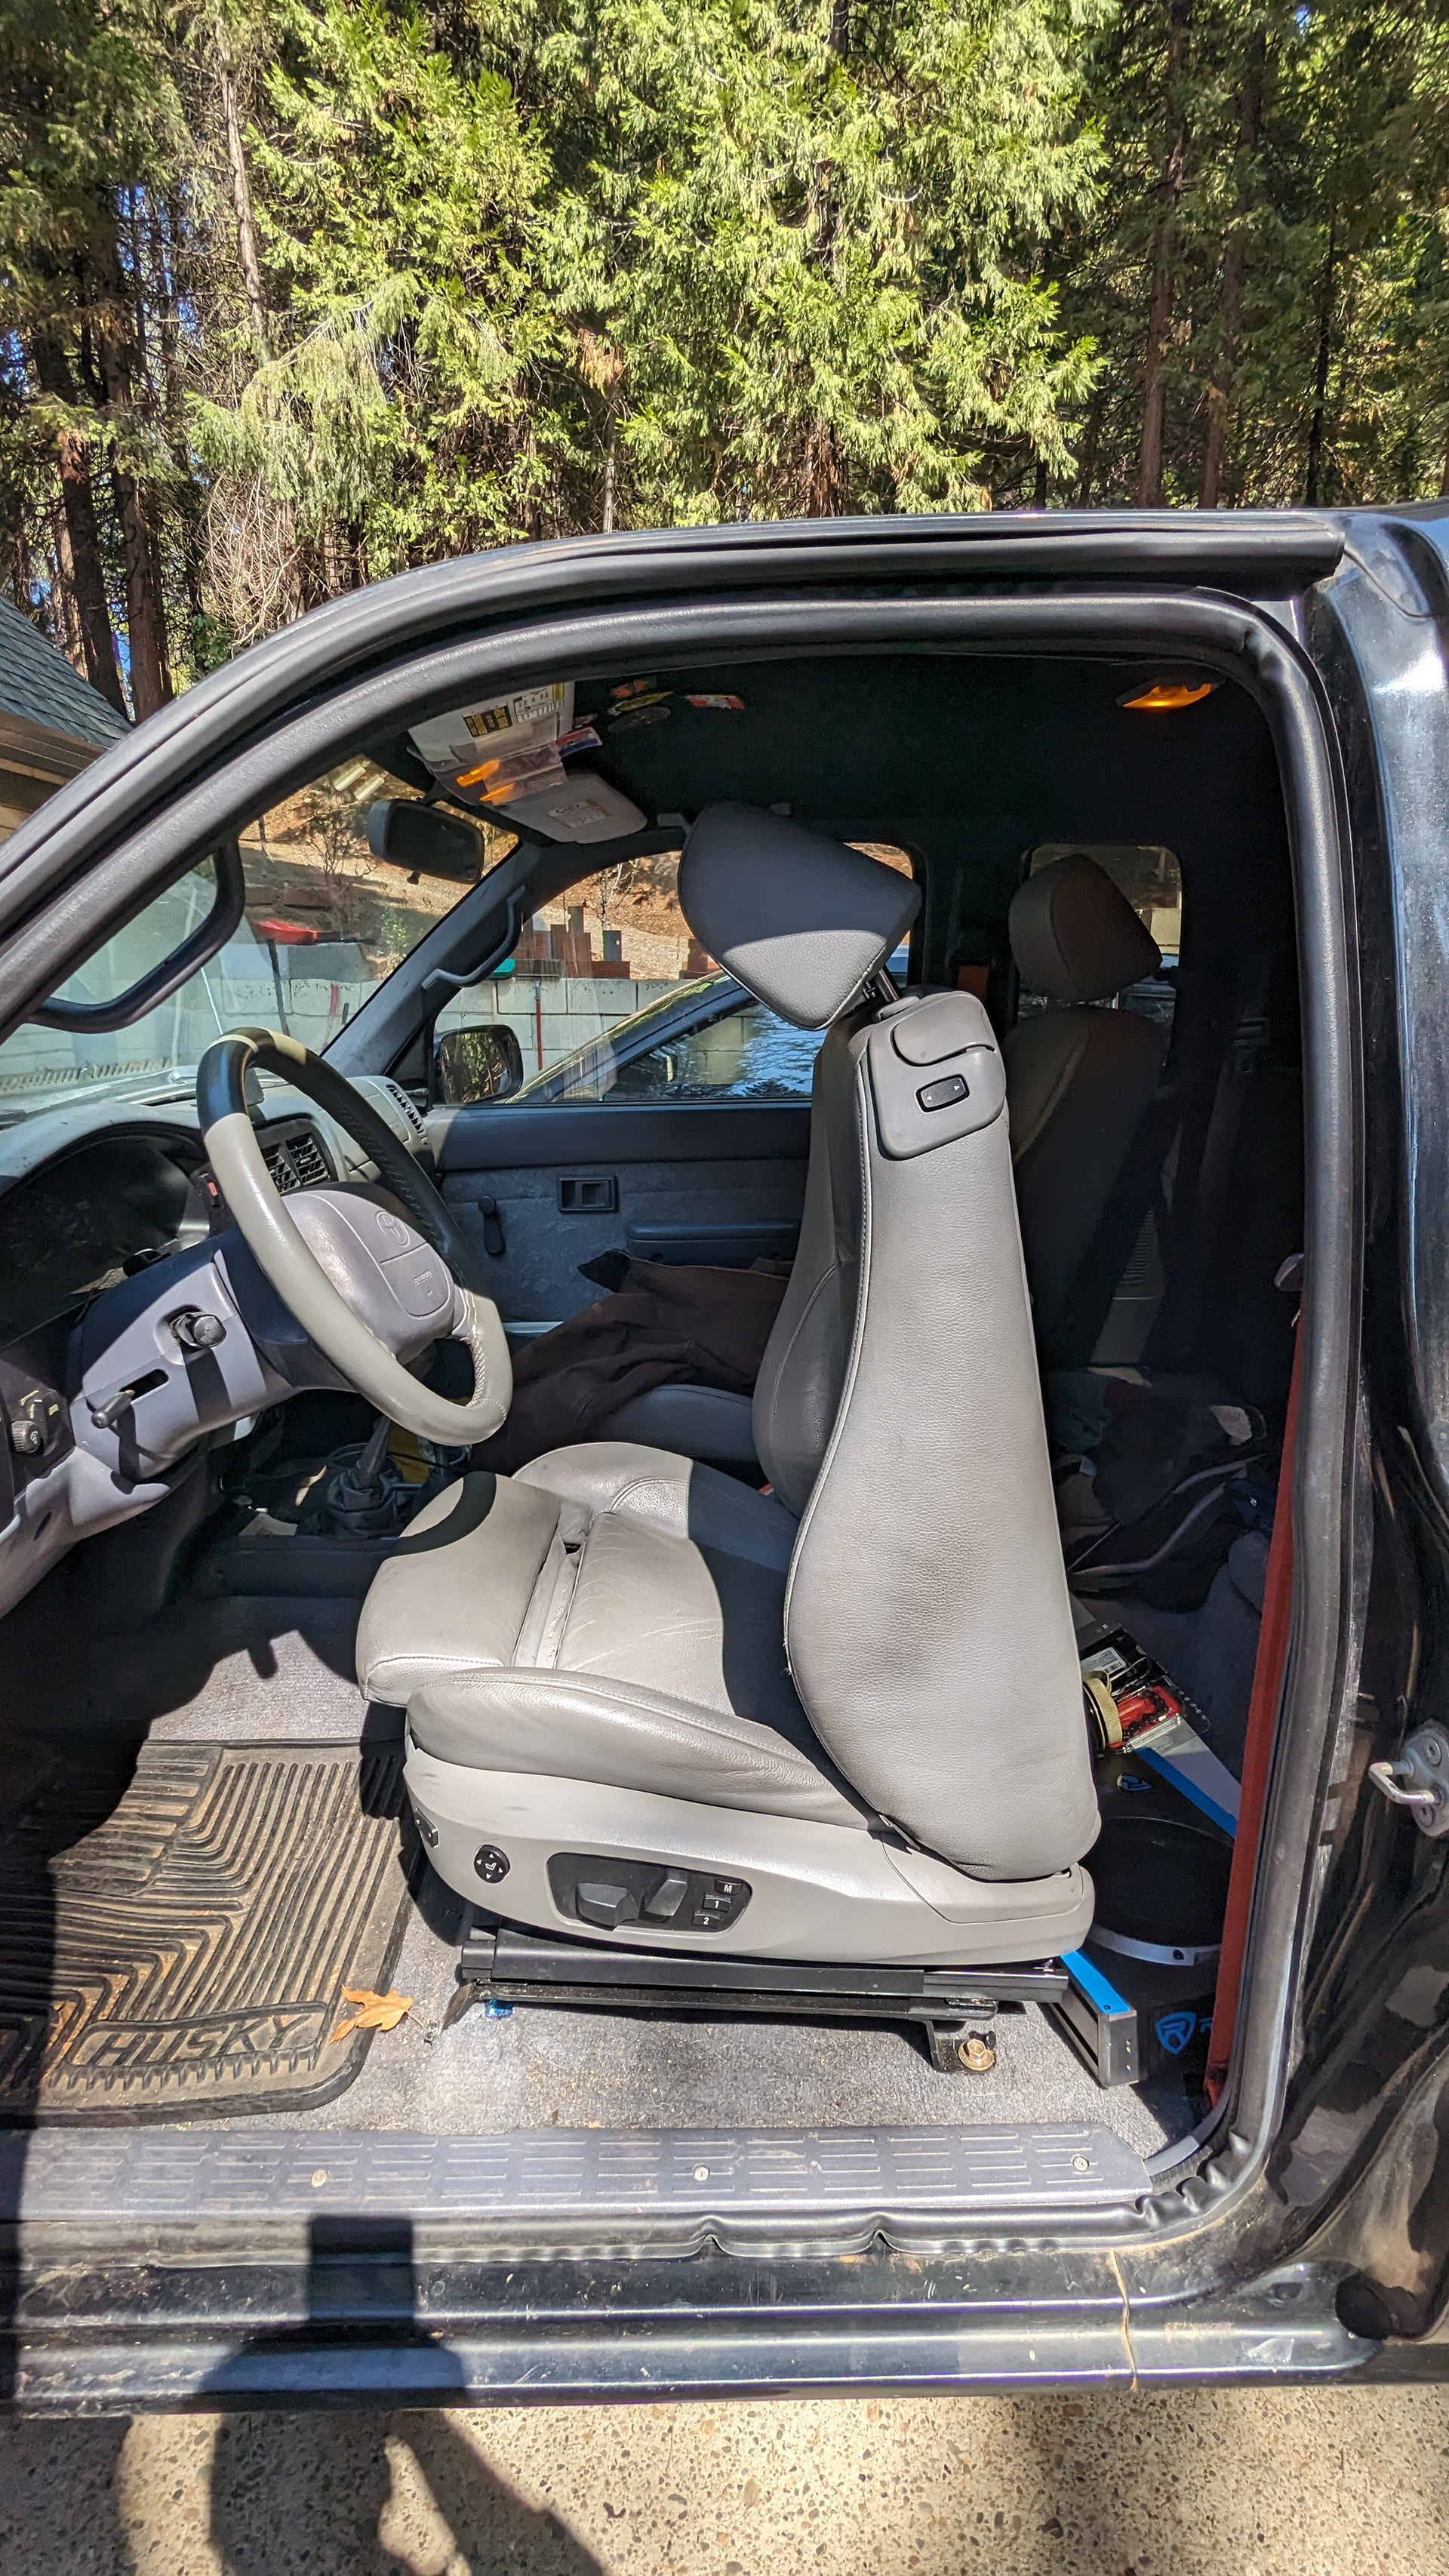
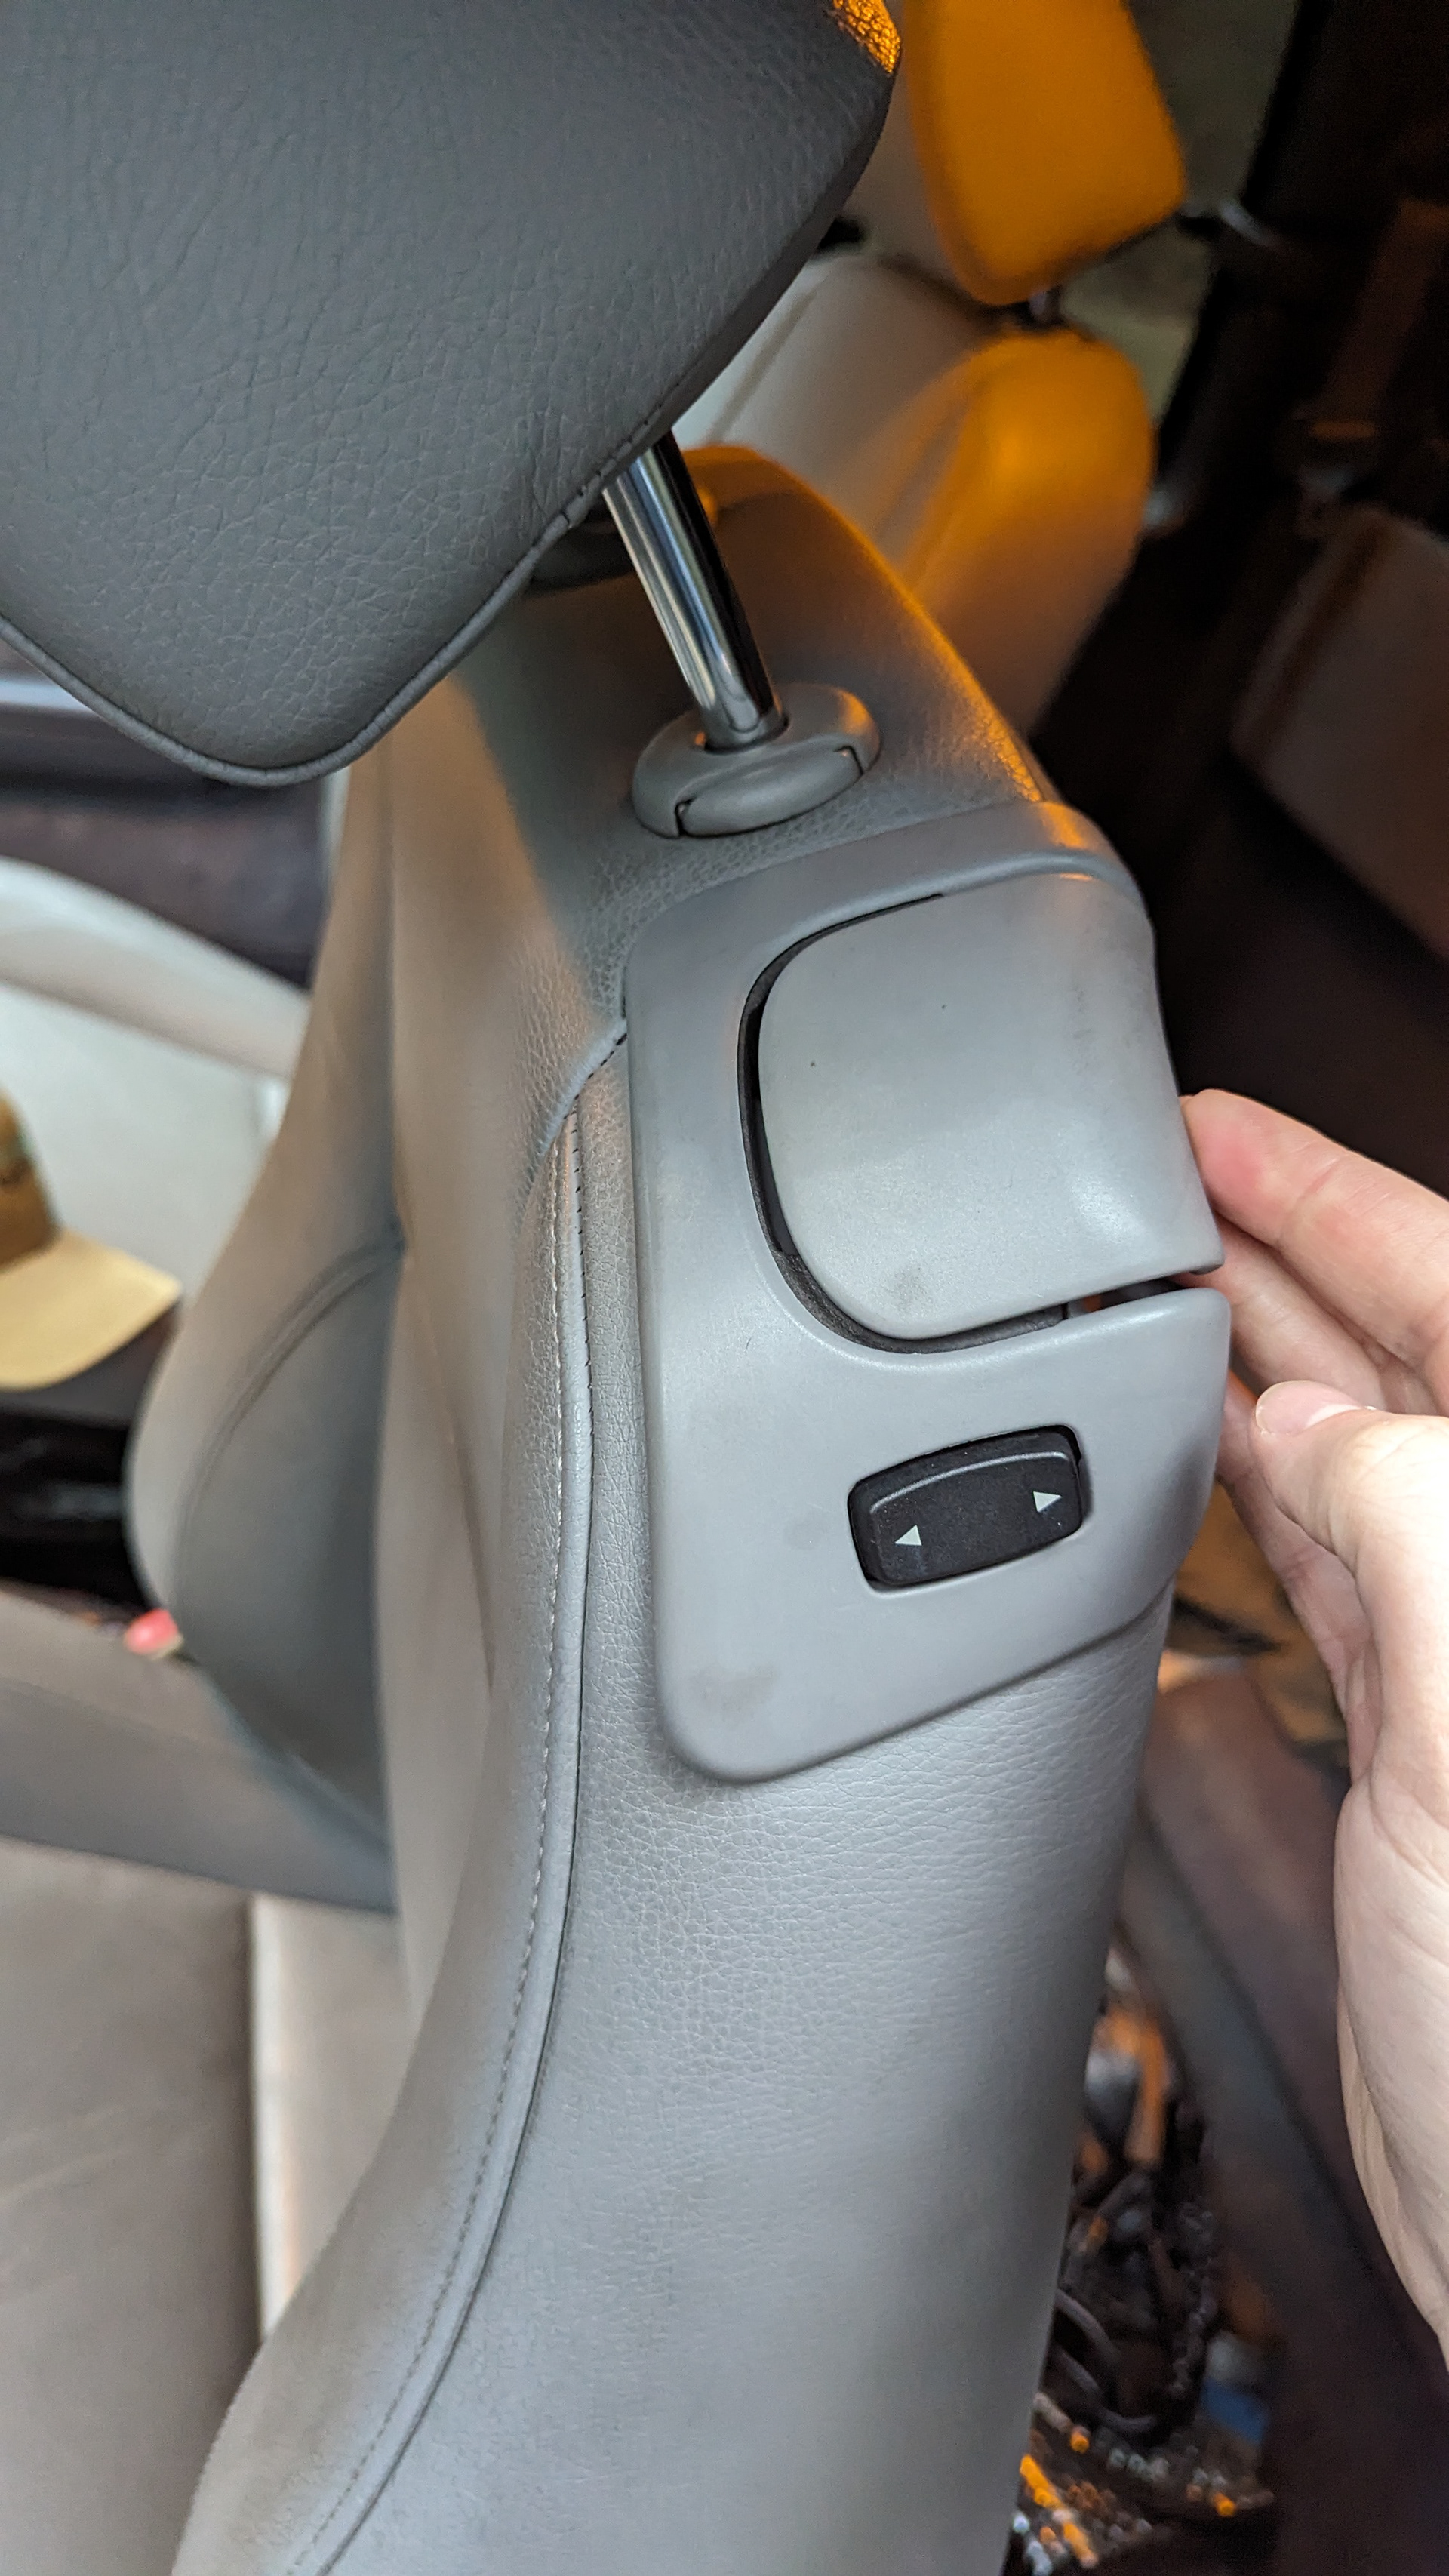
This piece is the difference between an E90 seat and an E92 seat
Misc Information
Alternative Mounting
The other way I’ve seen these mounted is to the floor pan. This is the superior method, as this should put the seats slightly below stock height, and then you can adjust them upwards. You can save yourself some money and go straight to this method if you don’t mind punching some new holes in your truck. I have not done this mounting method, and plan to investigate it in the future.
Here is the floor mounting that I have seen (Tan seat). Talking to the owner, he said he used a piece of 2x4 lumber as a rear spacer and bolted through the floor pan, with washers and bolts on the underside of the vehicle cab. This has the advantage of getting the seat as low as possible and allowing you to obtain a stock seat height, and you save money on the seat bracket. The disadvantage is you have to make new holes in your truck. (Don't forget to weather seal!) I intend to make this change in the future.
Another set I've seen mounted, this owner cut the OEM feet off his seats and welded them onto the BMW seats. I don't have a welder, so this wasn't an option for me.
**These were installed in a 3rd generation 4runner.
**These were installed in a 3rd generation 4runner.
Other Resources:
Youtube Video by HooptieDoodle: He wired up a pair of E92s in a Subaru, and covers a fair amount of the wiring, including the 555 timers (skips over the heated seats, and the switch on the quick access)
Youtube Video by HooptieDoodle: He wired up a pair of E92s in a Subaru, and covers a fair amount of the wiring, including the 555 timers (skips over the heated seats, and the switch on the quick access)
**Additional items that will be added to the guide**
Wiring diagram
Fuse information
Seat functions
Please let me know if there are more things you would like to have added by using the contact page on this site.
Wiring diagram
Fuse information
Seat functions
Please let me know if there are more things you would like to have added by using the contact page on this site.
**Links on this page are affiliate links through Amazon and will provide a commission to the author.
